
Designer Paper
Challenge 1 - Scene It With Nature
Welcome to Challenge 1 - Scene it With Nature
To enter this challenge all you need to do is create a scene on your card. Use multiple images to create a scene or just one image that is a scene. Tell the story. You can use any image as long as the image includes elements of nature, such as trees, birds, buildings, etc.). So create your scene and share it with us.
You have until midnight October 11th to enter your creation.
The winner for this challenge will be drawn on October 12th.
Please remember to follow the standard rules located in the rules tab above
Additional rules shown below:
1. Please make sure that you link to the URL of your project, not your blog;
2. You may Enter THREE Projects and you can combine your entry with as many other challenges as allowed.
3. Don't forget to add a link back to our challenge on your blog.
4. Remember anyone can enter my challenges but you must be a follower to claim a prize
Click Here To Enter Challenge 2 - Those Bloomin' Flowers
Click Here To Enter Challenge 3 - Animals Gone Wild
Click Here To Enter Challenge 2 - Those Bloomin' Flowers
Click Here To Enter Challenge 3 - Animals Gone Wild
Here is a sample card to get you started:
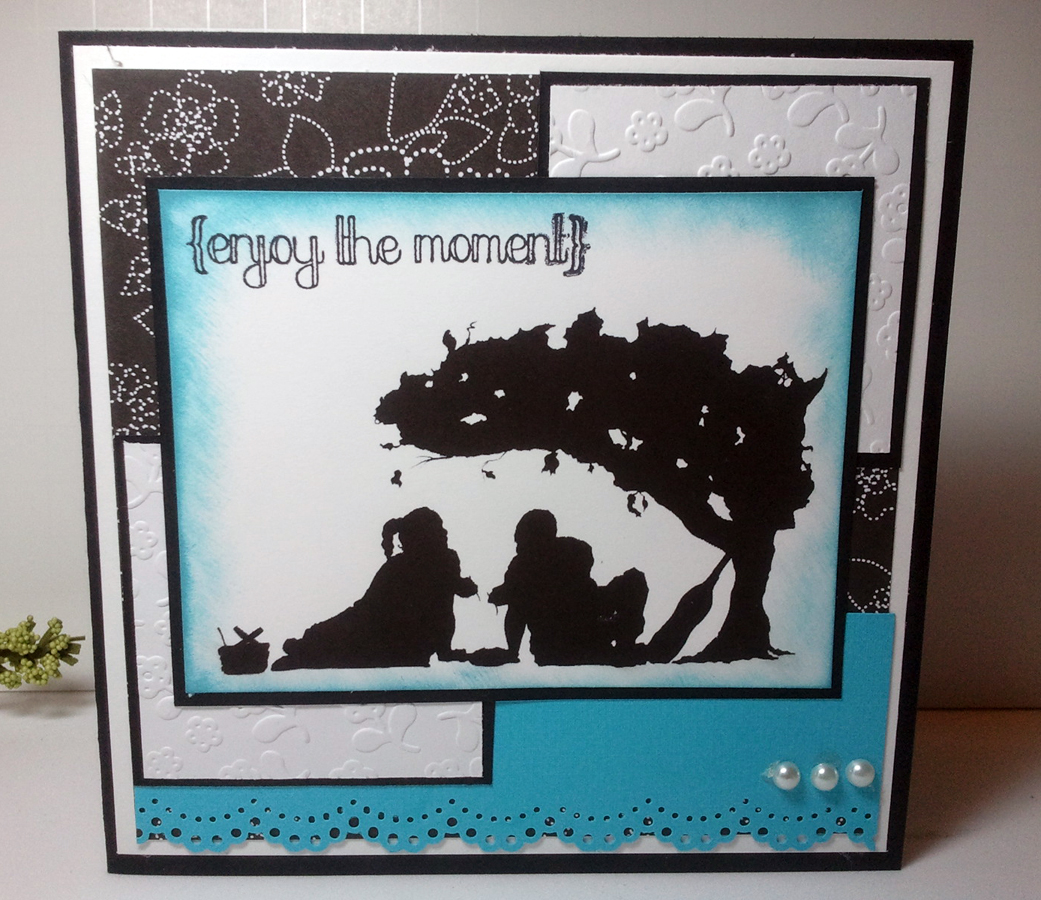

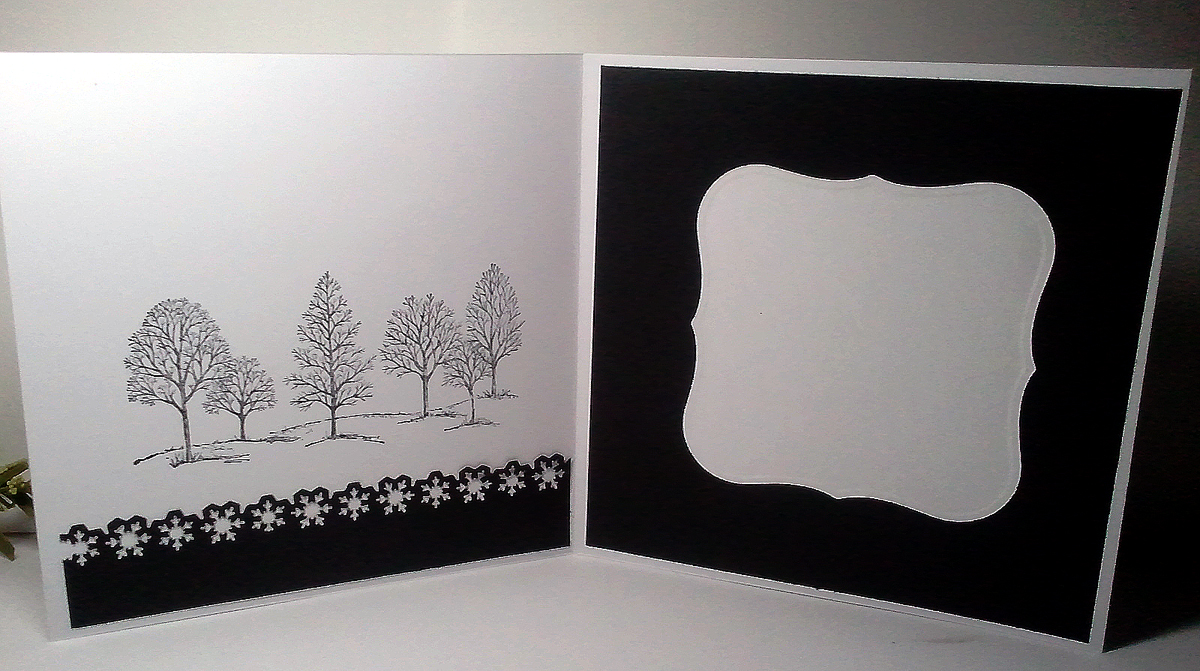
Using Robert's silhoutee made this card a cinch to make. On the inside I kept the color scheme carried the border design over making sure I added a space for a personal message.

Hopefully, I have inspired you to participate in this challenge. Remember we have three challenges going on so join in all three. I can't wait to see your creations!
Challenge 2 - Those Bloomin' Flowers
Challenge 2 - Those Bloomin' Flowers.
This is a fun challenge. Gather your flowers and think of all the colors of nature. Have fun with this one. Your flowers may be digital or they may be made from mulberry paper, it's all up to you. You can use any image but don't forget the flowers....and it doesn't have to be a card.
Here is a sample card to get you started:
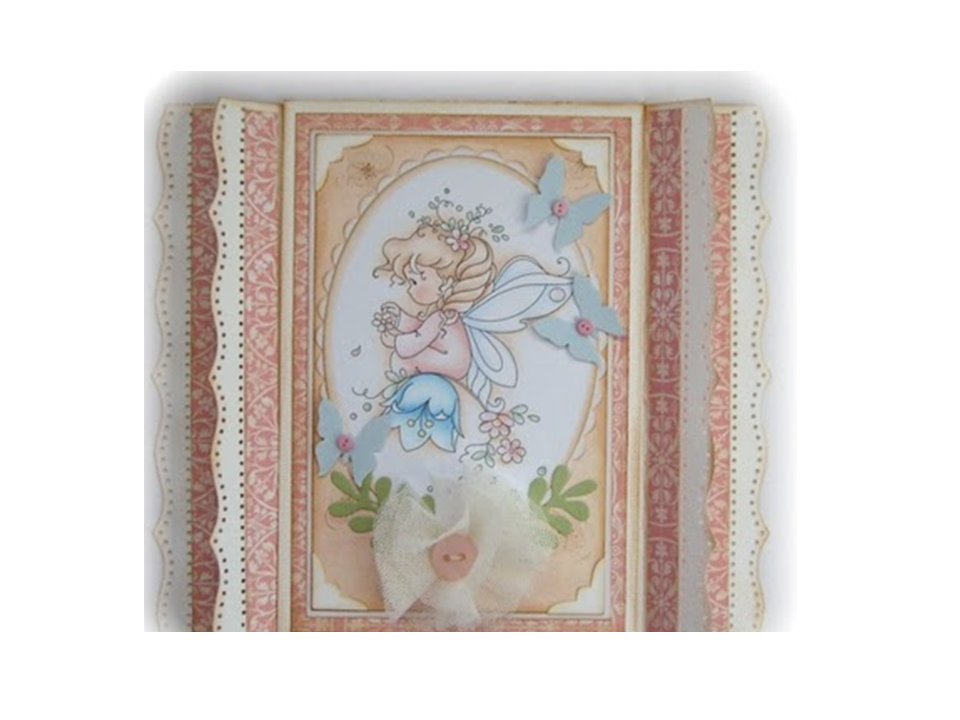
 I'm sure we all can recognize this darlin' image. It's another beauty created by Krista of "Saturated Canary."
She was colored using Copics:
Reds: R30
Greys: C3, C1
Blues: B93, B91, BG70
Browns: E25, E23, E50, E11, E13, E00, E000, E43, E42, E41, E40
I used Kraft Cardstock and Authentique Designer Paper. The flowers are 25mm Wild Curly Roses from Wild Orchid and I used a Spellbinders die to cut the corners.

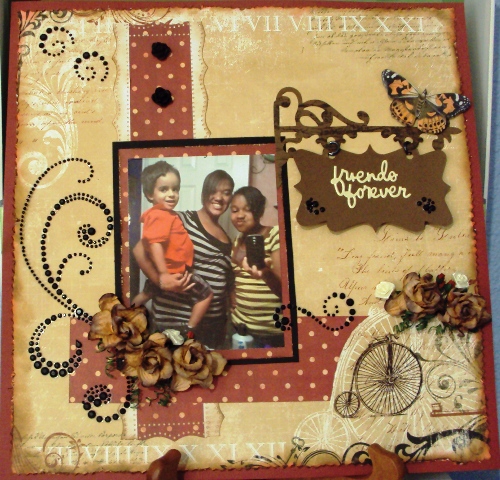
I saw a technique on Youtube on using a standard border punch and making it work as a punch around the page. It was pretty cool and easy to follow. I have forgotten where I got the image but I ended up with four of them.
The flowers are once again from Wild Orchid and the pearls are Recollection. My designer paper is Websters and the cardstock is Bazzill. I used Spellbinders to cut the Lacy Circle and the Teardrop circle.

This is a fun challenge. Gather your flowers and think of all the colors of nature. Have fun with this one. Your flowers may be digital or they may be made from mulberry paper, it's all up to you. You can use any image but don't forget the flowers....and it doesn't have to be a card.
You have until midnight October 18th to enter your creation.
The winner for this challenge will be drawn on October 19th.
Please remember to follow the standard rules located in the rules tab above
Additional rules shown below:
1. Please make sure that you link to the URL of your project, not your blog;
2. You may Enter THREE Projects and you can combine your entry with as many other challenges as allowed.
3. Don't forget to add a link back to our challenge on your blog.
4. Remember anyone can enter my challenges but you must be a follower to claim a prize
Click Here To Enter Challenge 1 - Scene It With Nature
Click Here To Enter Challenge 3 - Animals Gone Wild
Click Here To Enter Challenge 1 - Scene It With Nature
Click Here To Enter Challenge 3 - Animals Gone Wild
Here is a sample card to get you started:
 I'm sure we all can recognize this darlin' image. It's another beauty created by Krista of "Saturated Canary."
 She was colored using Copics:
Reds: R30
Greys: C3, C1
Blues: B93, B91, BG70
Browns: E25, E23, E50, E11, E13, E00, E000, E43, E42, E41, E40
I used Kraft Cardstock and Authentique Designer Paper. The flowers are 25mm Wild Curly Roses from Wild Orchid and I used a Spellbinders die to cut the corners.
I haven't finished the inside because I ran out of scraps so trying to get a flow is a bit harder than usual. My next card I really like because I am a lover of hats.

I saw a technique on Youtube on using a standard border punch and making it work as a punch around the page. It was pretty cool and easy to follow. I have forgotten where I got the image but I ended up with four of them.
The flowers are once again from Wild Orchid and the pearls are Recollection. My designer paper is Websters and the cardstock is Bazzill. I used Spellbinders to cut the Lacy Circle and the Teardrop circle.
For the inside I tried the technique again using white cardstock to create a space for a personal messge, and then on the right I printed the verse directly onto the DP.

As always thanks for stopping by and remember "find beauty in all things and then go create your own." Then go ahead and enter your creation in this challenge using Mr. Linky shown below (smiles). Can't wait to see what you guys create:
Creating Clouds
 Clouds Tutorial - by: Brenda O'Rear
Supplies:
Card stock
Punch/punches
Ink
Dauber or sponge
Scissors if cutting out template
Step One:
I have shown a few punches you could use to make clouds. I only used one
of them and for the other I used a die cut template. You can make your own template by stamping, punching, or hand drawing a cloud.

Step Two:
I placed the template on my white cardstock and used the dauber to sponge
around just the edges where there are scallops. You can see the clouds forming
where I sponged at the top of the cardstock. I usually only sponge around about half the template.
Here is a card using the above method

Step Three:
For my next card, I punched out a cloud template using a Fiskars cloud punch.
I used blue cardstock and placed my punched piece on the cardstock and
sponged white ink inside. Very simple!

My card for this method:

Step Four:
Another way to create clouds is to make cloud masks and place over your white cardstock. Be sure to tape your clouds to your cardstock so they don’t move around. I’m using a double sided scrapbook tape which can be removed when finished. Sponge or brayer the entire piece of cardstock with blue ink or whichever color you prefer. You can use gray for a cloudy day or I’ve seen very pretty clouds in brown for a little whimsy. Remove your masks and you have some beautiful, white clouds.
For my example below, I used Memento London Fog ink:
 Shown With Templates
 Remove Templates
I hope you’ll find my tutorial helpful and you have beautiful skies ahead.
Challenge 3 - Animals Gone Wild
Challenge 3 - Animals Gone Wild
If you're here then you're ready to showcase those creatures big and small. From dogs to cats and everything in-between we want to see those little cuties or those strong wow types. Any animal is welcomed in this challenge so get your mojo going and let's hear some noise...well we will pretend we can hear the animals calling us.

This was an inspired card that I created mainly for the words. The cage and bird was cut using a Tim Holtz die, embossed using UTE and popped up on the card.
I used a Martha Stewart punch to cut out the branches and added a few pearls to finish it off. The words were printed directly to the cardstock using my printer.
 For the inside I used the same paper and found a birdcage stamp to place in the upper right corner. I created a pocket on the left side with an insert for a personal message. I thought the paper was much to pretty to hide (lol).

 The inside of the card is nothing special but as usual I did my best with the leftover scraps. Maybe I'll add more later after a good night's sleep.
Well folks, I hope these two cards has given you ideas and encouraged you to participate in our "Animals Gone Wild" challenge. Enter your creations below.
If you're here then you're ready to showcase those creatures big and small. From dogs to cats and everything in-between we want to see those little cuties or those strong wow types. Any animal is welcomed in this challenge so get your mojo going and let's hear some noise...well we will pretend we can hear the animals calling us.
You have until midnight October 25th to enter your creation.
The winner for this challenge will be drawn on October 26th.
Please remember to follow the standard rules located in the rules tab above
Additional rules shown below:
1. Please make sure that you link to the URL of your project, not your blog;
2. You may Enter THREE Projects and you can combine your entry with as many other challenges as allowed.
3. Don't forget to add a link back to our challenge on your blog.
4. Remember anyone can enter my challenges but you must be a follower to claim a prize
Click Here To Enter Challenge 1 - Scene It With Nature
Click Here To Enter Challenge 2 - Those Bloomin' Flowers
Click Here To Enter Challenge 1 - Scene It With Nature
Click Here To Enter Challenge 2 - Those Bloomin' Flowers
Here are a few cards to get you started:

I used a Martha Stewart punch to cut out the branches and added a few pearls to finish it off. The words were printed directly to the cardstock using my printer.
 For the inside I used the same paper and found a birdcage stamp to place in the upper right corner. I created a pocket on the left side with an insert for a personal message. I thought the paper was much to pretty to hide (lol).
This was a real fun card with fun colors. The image is from Bugaboo Stamps, one of our sponsors this month. I used both prismacolor pencils with gamsol and copics to color this stamp. The chocolate punch is an EK Success and the red punch is Martha Stewart. The designer paper is DCWV and the cardstock is Recollections.

Well folks, I hope these two cards has given you ideas and encouraged you to participate in our "Animals Gone Wild" challenge. Enter your creations below.
Timeless Friends
Coloring Brown Hair
Copic Tutorial - Coloring
Brown Hair
Here are the copic colors used for this tutorial. There are other color combos for brown hair but this works for me: E21,
E25, E29
And
for my model I have used the gorgeous Anastasia from Make It Crafty. They have a complete portrait collection that works well to practice coloring hair.
STEP
1
I
always like to color the skin first as it gives a good idea of how the hair
color and style is going to suit the character. When starting the hair, I
always use my lightest color, in this case the E21, to lay down the first
highlights. Use the feathering technique and just flick the brush out. The heavier the pressure you apply the more texture you will get. When laying down the first
layer, leave some white space where the lightest part of the hair
would be. If there is alot of hair, color the hair in
sections starting with the front near her face. This is so that you don't have to
hurry too much in case the ink dries.

Then go to the next color, E25, and do the same thing but not quite to the
same length as the color before. Use the lighter color as a guide for
the direction of the strokes. It is important to pay attention to the direction
of the light source when determining what parts of the hair need to be the
darkest and the lightest. I like to do the part quite dark, with the light
source coming from the side. This would mean that all of the outward curves are
the lightest as they are closest to the light source, and all of the inverted
curves would be the darkest.

STEP
3
Then go in with your darkest color, E29, and again do a layer of color not
quite as long as the previous. In this first set of layering don't worry too
much about the shape of the strands as you can go back in after and lay more
color down. These first three steps are more about just getting the color on
the page.

Go back in with the middle colour, E25, and repeat the same feathering
process, but this time when you feather over the darker color, it pulls the
color down creating some blending.

STEP
5
Repeat with the lightest color and repeat the feathering process.

STEP
6
Now that you have gone from lightest to darkest and back again, focus on the texture and size
of the strands using E25, and E29, and now
the front section of her hair is complete.

STEP
7
Now
we move on to the next part of her hair. Below is an image of her hair finished. As she has quite a different
hair style the shading can be a little tough. As she has large curls, I have
made the inside of the curl the lightest and the two edges the darkest to make
them look more rounded. There are many different ways you can do this, so just practice with what looks the nicest
for you.
For
this section of her hair repeat the same steps as above, lightest to darkest
and back again. Then go back in with the middle and darkest colors to create
more texture and definition.

Hope
that helped you just a little bit! Thanks for stopping by!
Copic
colors used:
Skin:
E000, E00, E11, R11 | Hair: E21, E25, E29 | Roses: R81, R85, R59 | Flowers:
V000, V01, V04, V09
Below is this same image with blonde hair. If you like her better as a blonde, check back often for that tutorial is coming soon!

Magic Card Tutorial –courtesy of Marianne
( to see the video scroll to the bottom of this tutorial)
1. This card consists of
three pieces that are glued together in the end.


3. It's time to decorate with pattern paper. I have prepared four thin strips, and four
wide strips to decorate the sides of the wings on the card. The width of your strip will depend on the
punch you used to decorate the edges.

4. I have decorated the wings and the middle of the fields that will be
visible on the card.


7. And then I decorated the inside as shown here. Inside is the text I want to use. This could be a picture or anything, just make sure that the text/image is the right way :) I have attached double-sided tape to the small flap.

8. Turn the smallest piece of cardstock with the white or back side facing
up. Then position the flap at the top
making sure it can fold down easily. This
would be a good time to make sure your image/text is positioned correctly. When you are satisfied that it is correct
adhere your flap to the card.


 Here you can see the card open, showing the text/image and the space for
a personal message
Here you can see the card open, showing the text/image and the space for
a personal message


( to see the video scroll to the bottom of this tutorial)
CS: 6 x 7 Scored 1 ½ inch in from the edge of each sideCS: 6 x 6 Scored 1 inch in from the edge of each sideThis gives you a center measuring 4 inches on each piece of
cardstock.Use a border punch on the sides and distress with walnut stain if desired
2. Your 3rd piece of cardstock that will be the front of
your card should be cut at 4 x 7 ½ and scored at 6 and 6 1/8 Fold the score lines to ensure that the flap hangs down smoothly


5. The reverse side of the wings are also decorated as shown here. The white areas are glued together later

6. Here you can see how I decorated what will be the front of the card

7. And then I decorated the inside as shown here. Inside is the text I want to use. This could be a picture or anything, just make sure that the text/image is the right way :) I have attached double-sided tape to the small flap.


9.
Now add more double-side tape to the flap and the white side of the
smallest piece. We are preparing to glue
it to the larger piece of cardstock.

10. Here I have glued all the parts together, the two white areas
against each other, and the front card hangs nicely down the middle. I have
created a writing space, which is hidden by the front.


And here's the card completely finished.
If you fold the rear wings backward, and the main wing forward, so the
card can stand
Subscribe to:
Comments (Atom)