Busy Busy Busy

Click Here for Current Challenge 
or Use the Challenge Tab above

Can you believe that August is already gone, and September is here! Where has the year gone?  I went to one of our local stores this week and could not believe that every aisle was decorated and advertising a holiday of some sort.  One aisle had all the goodies for Halloween and on the other side was your Fall/Autumn decor.  Then about four aisles down you ran into your back to school products and Thanksgiving.

That's not the kicker though...we haven't reached Halloween or Thanksgiving and there are Christmas trees with lights already flashing in your face.  I know times are difficult, but is overkill really necessary?  I found it all to be a bit weird but I guess you could "flip the coin" and take a positive spin about everything.  It could be a head-start on preparation or just a reminder to those that procrastinate throughout the year.

For me it was indeed like an Outlook reminder that the holidays are just around the corner creeping upon us and with eight grand-kids, I really need to re-introduce myself to layaway and deal shopping.

Oh well so much for early reminders.  I do have a reminder for everyone.  A new month brings around new challenges over here at Mema's Crafts and this month we actually have a theme.

Our challenge theme is:
  Lace and/or Flowers
Click the Challenge Tab above for more information 
and to enter your project in the challenge.
The challenge opens on Sunday, September 1st.

Now to share with you what I have been busy creating in my spare time (not much of that when your working hours seem to keep growing) but I did manage to finish my mini (previously posted) and now I actually finished two cards to share with everyone and I found one that looked as if it had been forgotten.

Hope this will inspire you...and of course don't forget to join next month's challenge and check to see if you're a winner by clicking on the winner's tab.


If anyone has any questions about these cards just leave me a comment and if you don't have any questions I would love to hear from you.  Its lonely out here in blog land if no one speaks to you. :(

Gotta go check and see who my winners were and get those posted and then I need to check with "My Enchanted Paper Creations" to find out who wins the three Cheery Lynn dies as the bonus winner.

Well until next time be creative, be safe and see beauty in all things.  
Thanks for stopping by and come again real soon.

~~Lesia~~


Paper Bag Mini Album

Hello everyone, if you've been wondering where I've been, well let me just say I have been locked in my craft-room working on a mini album that was a bit more work than I expected.

We followed a tutorial on YouTube posted by Gina of "My Scrapper Sisters." The end result is I had fun working this project with my crafting BFF (Joyce) and I am 98% finished, so I am going to share a few photos with you.

BEWARE!!!! THIS POST IS INFESTED WITH PHOTOS!!!
Above is a view of the front of my "Vertical Paper Bag Mini Album"
Papers: Kraft Cardstock and Recollections 
Documented Memories Patterned Paper.
The little white tabs sticking out at the top are inserts that can support a 4x6 photo on one side and a journal or another photo on the opposite side.

The back cover with my signature stamp

My closure was made with duct tape a key ring and a swivel clasp. 
 This allows for me to add more embellishments and the closure will expand to accommodate the extras.

On the spine I added a face plate to support the closure band and from the ribbon I hung a few charms I found at a yard sale.

This page will open further to show more pockets where you can add a photo or whatever.

This is the inside of the front cover. The right side has two pockets, but I removed the journal tags that were housed in them.

The right side of this page has a pocket that holds a mini album that is kept closed by a magnet. The 3x3 mini album will hold 12 wallet size photos.

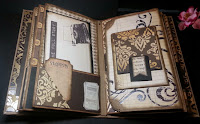
The following pages are all designed the same. Each page opens into 3 panels as shown in the images below and they each have room for a 4x6 photo or a pocket that hold a tag where you can journal or add your notes.


This is the inside of the back cover featuring a mini flip album that can hold 7-14 photos based on how you want to use it.

This is one of my favorite pages. I used it to hold quotes and tags that I cut from the paper collection and added my own pockets. On the left I added a side pocket but the tag is not shown in this photo (still needs to be matted)

The center page that has 3 letter tags "M-memories; L-love; C-cherish" and then there is room for a 4x6 photo.

The entire album has 6 pages and each page has four panels so there is a lot of space here. I created my mini with very little embellishments but I think it turned out nicely. Additionally, each page has a top loaded insert that will hold both photos and journal. That's 6 more panels, so with this album you have a total of 36 panels to play with...THAT'S A LOT OF SPACE!

I hope this post hasn't drained you because it was rather long, and that is why I didn't post all 36 pages.  I think 12 photos was enough to give you an idea of what the album looks like when finished.

This is a really cool mini album and I will try another one with the paper bags going horizontal instead of vertical just to compare the two.

Well that is all for tonight but I shall return soon with perhaps a new card to share with everyone.  Let me say before I end that the month is almost over and a new challenge is ready to begin with a brand new sponsor, so be sure and stop back by.  We will also be announcing two new winners at the end of the month (once I get back from vacation) so check to see if you're a winner.

Thanks for stopping by
Hugs
Lesia

SNEAK PEEK FOR SEPTEMBER CHALLENGE:  FLOWERS AND LACE


Learning and Sharing

I am going to refer to this post as a learning post because it focuses on a card I created following a really quick and easy to follow tutorial.  Hopefully, you will find this card as cute as I did.  I haven't added a sentiment or anything although the tutorial does call for one.

Anyway, take a looksie and tell me what you think.

Here is the front of the card using Graphic 45 French Country Paper Collection and Tim Holtz's Die.


Now for the inside which is simple and coordinates with the front of the card...at least I think it does...doesn't it?

A really quick masculine card for that special someone.  Below are the instructions for creating this card should you decide you want to give a go.  I couldn't find the link to the original tutorial but I did capture it on my hard drive so now I can share it with you.

If you do follow it and create a project please let me know so I can check it out.

That's all for now guys...thanks for stopping by.

Hugs 
Lesia
************************************************************
GRAPHIC 45 TUTORIAL FOLLOWS

1. Cut a card base from black cardstock for a 5 x 7” card.


2. Cut two coordinating pattern paper pieces (from French Country 6 x 6 Patterns and Solids) 3” x 4 3/4” each and adhere to top and bottom portion of the card front. Then cut a Carte Postale image from the French Country 12 x 12 paper pack and adhere to center of card.

3. Create a unit:
    • Cut red cardstock 1 1/2” x 4 3/4” and pattern paper at 1 1/4” x 4  3/4” and adhere together.
    • From blue cardstock die-cut image of a fleur-de-lis and ink edges
    • Using ribbon (or faux leather material) weaved through a buckle
and adhere to the paper unit, tucking the fleur-de-lis behind it. Add
a metal key to the fleur-de-lis using Tacky Glue.

4. Adhere the unit to the card front.

5. From black cardstock, die-cut an Eiffel Tower shape and adhere to card using foam tape. Cut the postage image from French Country 12 x 12 paper and add DAD stickers, then pop up with foam tape in lower right corner of card. Finish the card with a gray colored satin ribbon tied into a large bow. Adhere with Tacky Glue.


Shown above is the original card created with the tutorial.  Notice I left the bow off and the sentiment "DAD" just in case I wanted it for something else.

500 Followers!!!!!!

Yipeee!  Hallelujah!!! I reached 500 followers! I cannot believe that it actually happened and before the end of the year.  I am so thankful to all of you that have helped me reach this goal and especially for visiting my blog and participating in my challenges.

Well it is now time to name one lucky person as the 500 follower winner and I know you are anxious to know if it is you (smiles).  Before I announce the winner let me first remind you to check the winners tab above to see if you are our first August Challenge winner.  If you are the winner you have won a e-Card to Saturated Canary.  Be sure and check above.

Okay, hold on a little bit longer because now, I want to share a quick card with everyone.  Nothing special about this card but I thought it was cute and I used some scrap Webster pages along with so left over pieces from the paper pad to create this.  I hope you like it.


Finally, it's time for the 500 Follower Winner to claim their prize by contacting Mema at memascrafts2@gmail.com 
and that winner, 
selected by random.org is none other than.

Janet Broadway
Congratulations!

You have won a $50 gift card to the store of your choice!
Remember to grab your winners badge and display it on your blog.

Thanks to all my lovely followers and soon I will have another goal to reach and when I do, someone will win $100.00 just for being a follower.  You guys make my blogging experience fun and I love it.  

Don't forget there are two more prizes (bonus challenge and August challenge) to be given away, and there is still time to enter for our second drawing in the challenge.  Just click the tab above and enter your project.

Hugs
Lesia

Your comments are always welcomed!

August Challenge and Bonus Winners

Boy August's Anything Goes challenge has taken off to a fabulous with lots of inspiring projects. Thanks to all of you that give me something to do in the evening after work and for taking time to stop by and visit.

Since there is a lot going on I'm not going to waste any more time so here is our August 15th Challenge Winner by random selection:

congrats go out to entry #41
Teresa of "Red Obsession"


Thanks for taking time to play and share with us at
Mema's Crafts.


Don't forget to claim your prize before 8/22.  Contact Mema at memascrafts2@gmail.com or lesia1707@att.net.

******************************************************************************************************************

The end of the month has finally arrived 
and we have another winner!

congrats go out to entry #184
Jennie Silver of "Cards and Things"


Don't forget to claim your prize before 9/07.  Contact Mema at memascrafts2@gmail.com or lesia1707@att.net.

Mema's Crafts request that you grab the winners badge
 and display it on your blog.

******************************************************************************************************************
We haven't finished though...
check back to see the results from our
 "Grab Bag and Bonus Challenge"

Bonus Challenge Winner By Random Draw is #20 "Beebeebabs"!

Contact memascrafts2@gmail.com to claim your Envelope Punch Board, Spectrum Noir Essentials Marker Set and a gift voucher.


Bonus Challenge Random Winner by winner selection is #26
Deborah Adams of A Creative Life
Contact memascrafts2@gmail.com to claim your Simple Stories mega kit collection.  I will need your mailing address.

Design Team Winner by Participant vote is #1 
Donna of Creative Designs!
Contact memascrafts2@gmail.com to claim your Teresa Collins "Save the Date" mega kit collection.  

***********************************************************************************

Up and Away

Up and Away....do you ever have those days where you imagine traveling to some exotic place and just living out the word "freedom".  Wouldn't it be wonderful to not only travel to some mystical land but to travel in an uncommon or adventurous way.

Hot air balloons would be a helluva way to travel to places unknown.  I thought of that with my new Cheery Lynn "hot air balloon" die, which is part of her new SteamPunk collection.  I don't think I've shared this card with you guys, at least I hope I haven't.

Yeah, I'm still trying to re-organize my layers of cards and I'm finding a few that I don't recall sharing.  So without further ado, I present my "Thinking of You" card featuring Cheery Lynn's hot air balloon.


The front of the card features two styles that you get when you buy Cheery Lynn's hot air balloon die.  In addition to the style you also get the required die to make a backing for the die.  Using this unique technique you can cut the front of the balloon one color (I used white) and then a different color for the backing (I used black).  With this technique you have the ability to be real creative especially if you add a little paper piecing in the mix.


On the inside I used left over card-stock pieces from the front.  Then I added a balloon stamp and a sentiment to finish it off.  There is still space for a small personal message or a tag can be added on the left for that message (which is what I ended up doing after I took this photo).

The next two photos are close-ups of the balloons so you can see the actual detail of these two dies and the differences better.


Cheery Lynn's SteamPunk collection is a must have and I will share another card I created using another versatile die from this collection in a later post.
Don't forget to enter our August challenge as well as the bonus challenge we are hosting.  You can find these challenges by clicking on the tabs above.

That's all for today, my lovelies.  
Hugsz
Lesia


Weekend Fun

Click Here for August Challenge
Click Here for Bonus Challenge

Hello my fellow crafters.  To start let me just say that I am so excited because I am so close to reaching my goal of 500 followers.  Just 10 more to go...whoopee.

CHALLENGE UPDATE:  To cut down on the confusion with those that advertise my challenges, beginning this month my winners will always be selected on the 15th and the 30th of the month regardless to the day it falls on.  This eliminates confusion...so we will still have two winners per month and if you enter prior to the 15th you will get two chances to win, so enter early.

Now a bit about my weekend which started on Friday, (lucky me) when I got the chance to meet another fellow crafter.  We crafted and just played together and had fun.  The goal was to create three cards but we only made two, but I think it was still fun.  I am not going to post the cards though...I'm going to wait until Brandy showcases her's and then perhaps I'll share mine.

Anyway the heat here has made it impossible to do anything outside so of course I decided to organize a bit more.  I found a few cards that I am not sure if I've shared them already so if I have please forgive me.  At least I will file them away this time and then not get confused again.

I need to make another trip to visit with our seniors so I can donate some of these cards.  They can add up quickly and I am so addicted that I just keep adding to the stack.  Oh well that's the life of a crafter and I am happy with it.  Here are a few cards I'd like to share...hope you enjoy.


I created this card using the masking and sponging technique.  Embossing folder is SU and the image is a Prima stamp.


I created this card using a bit of DP from Basic Grey (I think).  I added the Memory Box Whimsy Circle behind the sentiment.


Peek Inside


The other embellishments I had in my stash.

I fussy cut the journaling tag and added it for a personal message.


Hope I haven't already shared this little card but if I have please forgive me.

The border is Cherry Lynn and the pleats were created using a Memory Box die.


Peek Inside


The center flower was created using a Cherry Lynn die (I've not mastered this just yet) and the stamp is from Just Rite Stamps.


Well believe it or not this is all I have for today.  Don't forget my August challenge is open for entries and there is a bonus challenge that you will not want to miss, so by all means check it out.

Hugs 
Lesia


August 2014 - Anything Goes

Last month's challenge was fun and for those of you that participated and played with us , we truly appreciate your time and support.  We hope you'll play with us again this month for our favorite challenge theme.....

"Anything Goes"

So this month we want you to have fun doing what you do best and then share that talent with us. And remember it doesn't have to be a card, so everyone that has a craft can enter and play with us.

The sponsors for this months' challenge are:


The Paper Nest Dolls is a line of digital and rubber stamps designed by owner and illustrator, Christine Young. All stamps are inspired by her children and are truly a labor of love. Their rubber stamps are made from the highest quality, red photopolymer on the market and come deeply etched and cling mounted. They are pre-cut as well, so all you have to do is ink, and stamp!  The cutest images...that resemble delicate little dolls. Visit Paper Nest Dolls and be prepared to smile.

Make it Crafty

Make it Crafty specializes in digital and rubber stamps that allow you to create scenes with ease. Their famous little houses are very popular, along with landscape scenes, background objects like fences and swings, garden images to stand your characters in front of and more.

They also have a large range of digital stamps and a growing array of choices in their rubber collection. They also have a range of uniquely designed laser cut chipboard embellishments, with very fine detail specifically designed with card makers in mind. If you haven't visited Make It Crafty before, be sure and do so and be amazed.
*********************************************************************
Now for a peek at what the 
M&M Girls have created to share with you.

Judith
Image "Boogie Board Owen" - Paper Nest Dolls

Image "Coral Reef Border" - Make it Crafty

 Penny Rae


Image "Tea Time Avery" - Paper Nest Dolls
Image "Alysa Elven Princess" - Make It Crafty
Donna
Image "Rainy Day Elliie" - Paper Nest Dolls

Image "Jacinta Sitting Thinking" - Make it Crafty


Lisa
Image "Shrunken Alice" - Make it Crafty

Image "Genie Avery" - The Paper Nest Dolls

Princess
Image "Chelsa" - Make It Crafty

Image "Love Strung"- The Paper Nest Dolls

If you're wondering what I did just check out my post. But in the meantime we want to see what you've been busy creating! So enter below and don't forget to join the bonus challenge and vote for your favorite Design Team project.


Related Posts Plugin for WordPress, Blogger...