New Discovery - The Book Card

It has been about a week since my last post but I tell you I have a busy as a bee making honey.  Getting back in the swing of things at the office can be overwhelming at times, but I manage to remember the routine; inhale, relax and exhale.  This routine can keep you from saying whats really on your mind at times and it tends to support you keeping a job.  Don't misunderstand me, I love my job, I love the folks I work with and I enjoy what I do...however there are those moments that drive an "A" personality such as myself just plain crazy, and all thats left to say is that "it is what it is" and that will never change.

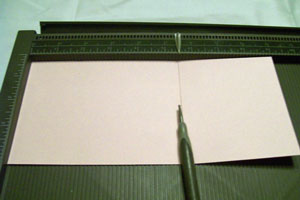
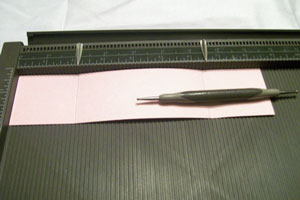
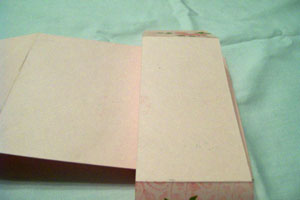
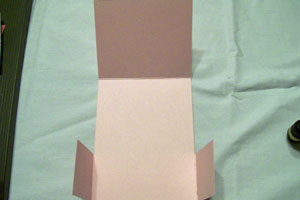
So in the meantime however, I ran across a tutorial about creating something called a book card. I found this really interesting and could not believe how easy it was and how adorable they could be.  Most of the tutorials were in centimeters, and while I am really good with math....well the USA hasn't caught yet...so inches is all I know and converting just doesn't work well. Anyway I did find one that was in inches and it turned out rather nice, so much so that I ended up doing 4 of them. While they were all lovely I wanted to create one 6x6 but just couldn't figure it out. But the heavens were watching over me.

I met this wonderful lady Tracy, who understood my dilemna and actually took the time to figure out what measurements I needed to create a 5.5 x 5.5 book card. She had to have come straight from the direction of the heavens.  The measurements she provided were perfect in every way.  Please go visit her channel on youtube "tracylovestoscrap" and visit her blog to see her wonderful Valentine Book Card.  She even has a step-by-step tutorial with complete photos. Click here for Tracy's tutorial.

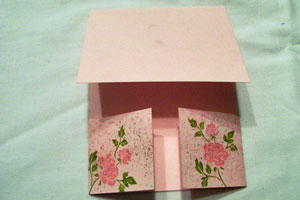
Now here is a peak at my attempt of the "Book Card".  My first one is called "Style" and I'm giving it to a friend that I think has a lot of style.

This is the front of the card.  I used the DCWV Mademoiselle paper pack, added ribbon, pearls and a simple brad to finish the front.

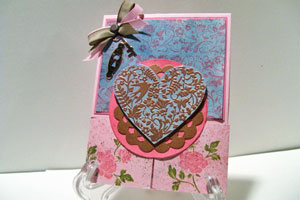
The paper itself carried the card with very little embellishments required.  The sentiment is one I've had for a while so I'm not sure where I got it.

Here is the back of the card and a glimpse of the spine.  Again this is part of the same paper pack which I added nothing. On the spine I threw in some glass beads to bring out the red that is already incorporated in the paper.
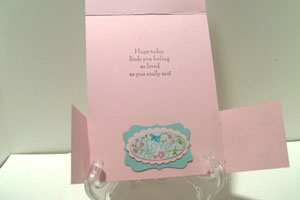
Finally is the inside of the book card. On the left I added a pocket that holds one of the kraft envelope that I ran through my embossing folder and then placed it inside the pocket I made.  Here you can place a bite size candy bar, money or gift card. I added a pearl sticker and a corner embellishment.
     On the right side is the shadow box that is approximately 1 inch deep. I embedded a sentiment and a purse inside the shadow box. I decorated it with pearls and beaded stickers.


Book Card Two

This next book card I am going to enter in Tuesdays Color Challenge over at The Outlawz.  The challenge was to use Cream, Peach and Green.  Beautiful colors no doubt but finding paper that actually said peach or cream was not the easiest thing to do so I had to work with what I could find.  The peach appears dark in the photo but it is a shade of peach, at least that is what the label on the bin said. Again I want to say thanks to Tracy, because without her this little book card would never have been created.

This book card is sized at 5.5 x 5.5, which I really like.  Thank you Tracy!

I used Webster Pages and Bazzill cardstock. The paper was embedded with peach, cream and red flowers so it worked perfectly. The Cream and Peach roses are from Wild Orchid. (Love Wild Orchid flowers)

I punched the border with none other than a Martha Stewart punch.


On the inside I created a pocket on the left side and added a tag for a personal message. I also added a sentiment on the pocket.

On the right is the shadow box where I added a shaped border tape to the outside of the box and added some K&Company 3-dimensional stickers.

The following photos show the book card laying down allowing you to see the illusion of an actual book.  Additionally, I wanted to show how I stitched the spine instead of adding any embellishment.


Well ladies I hope you've enjoyed this rather long post but I did want so much to share this new discovery for me.  Remember to check out the tutorial on Tracy's blog or you can watch her video right here on Mema's Crafts.  Check out my tutorial listing in the sidebar.

As always thanks for stopping by......remember to
"find beauty in all things and then ....go and create."

January Sketch Challenge

Things have be going well for me although I still sound like a frog (not quite finished with the flu).  My packets for my ladies went over really well for the first time, but bless their hearts they do move just a bit slow, therefore I am glad I had the sense of mind to pre-cut the paper. We made a simple card that I thought would take no more than 2 hours that ended up taking 4.5 hours.  My little group consisted of 7 ladies ages ranging from 77-83 but they are a fiesty bunch.  I'll post a few cards in a later post but for this post I want to announce my January challenge.  

Birthday Sketch Challenge

Using my birthday as the overall idea for the theme I thought we could use a sketch to create a project that represents a celebration.  Since it is a celebration add a bit of bling, ribbon and whatever else fits your fancy.  The sketch comes from Roni from "Ink Stains" and so is the sample card. There is no rule that your project must be a card, so allow your imagination to flow...the only RULES are:
  1. To enter this challenge you must be a follower of my blog
  2. Your project must follow the sketch although you can rotate the sketch to your liking.
  3. Create something new and do not link to an old project please
  4. Your project should include a sentiment or journaling (for scrapbook pages)
  5. Leave your name and a direct link to your entry using Mr Linky or use the "Contact Me" button in the right sidebar to email your entry to Mema
Here is the sketch for this challenge as well as a sample card.


Remember to add your bling, ribbon, lace and whatever else makes it a celebration.
The winner of this challenge will receive:

(1)  Crop-A-Dile (Lime) (Case, Tool and Eyelets)  by We R Memory Keepers

This is an amazing tool that will allow you to add that little bit of extra to your project.

I am excited and can't wait to see what you create.

Remember to invite your friends and tell everyone to participate for this opportunity. A minimum of 10 participants is required for this challenge to be considered valid. If we do not have 10 participants at the end of the challenge a consolation prize will be awarded.

GOOD LUCK TO EVERYONE THAT PARTICIPATES IN THIS CHALLENGE.


Another Challenge Entry

Here is another card for the Tuesday Sketch Challenge over at The Outlawz.  Below is the the sketch and my interpretation of the sketch.


My card was made using Prima paper and the sentiment was cut out using Spellbinders Fancy Tags. I used a Martha Stewart border punch to create the mat under the ribbon and the ribbon was from Offray. 


No I am not finished yet. I have another card I would like to share with everyone.


My next card I am entering in Sketch Challenge #7 over at Lets Capture These Sketches.  Below is the sketch and my interpretation.


For this card I once again used Prima paper along with Paper Studio cardstock.  The sentiment is from Clear Art Stamps and the buttons I found in my stash.  The ribbon is some I found in my stash, because I'm not very good at tying bows so until I improve I refuse to purchase really nice ribbon (cost over $5).

Well this is all for tonight, but thanks for stopping by.

Double-Dutch Fold

Hi Everyone, I learned a new folding technique today and wanted to share it with you. Additionally, I captured the steps for creating this card from Split Coast Stampers and have added it to my list of tutorials to include a video.

It looks really difficult but once you do one you discover that it is not as hard as you imagined. I was really pleased with the way it turned out, so check my card out and let me know what you think then go and try it for yourself using the tutorial found in my right sidebar under tutorials.

This is the front of the card, and here is the cool part. If you lift the image up you reveal the bottom of the card which is a   little gate (gate-fold) that opens to reveal your sentiment.

Okay maybe its not all that special but for me anything new is always special.  I thought this was fantastic and yeah I did a few of them just to get the hang of everything but I won't bore you by posting them all.


This is a view with the bottom gate opened to reveal your sentiment.  I didn't take a photo with the the top flap open but it has a personal space for writing and is layered the same as the front of the card.


Hope you like the card and will try the tutorial. So as usual and always..thanks for stopping by and...

...find beauty in all things and then go create it!

Weekend Blast

This weekend has been a blast for me especially with it being my off-Friday and I had absolutely nothing to do except sit in my craftroom and try to get inspired. After all Valentine's Day will be upon us soon so I think I need to get busy creating.  At the moment I think that I would much rather go and fix me a little drink along with some Ruffles potato chips but for some reason Weight Watchers doesn't list those items in my little book. Guess I will play with my paper.

I decided to create a few cards and I am going to share one with you that I plan on entering on "The Outlaws" Tuesday Color Challenge.  Yeah I try to enter every week...comes in handy when you have crafters block or something.  Well here is the card:
The challenge was to use red, white and black in your card and the twist was to add embossing. I did this layout several times trying to figure out how to get the embossing to show but it doesn't show really well.  If you look closely you will see peeking out from under the flowers is the embossing.

The black mat is actually embossed using one of the Sizzix embossing folders and then I used a Martha Stewart punch on the border. 

The image is a digi stamp I found on Clearly Vintage and colored with copics. I added just a touch of gold stickles to the center of the flowers to add a little depth. The paper is all from Paper Studio and part of my stash.  The inside follows the layout of the front.

Well thats it for now....thanks for stopping by.

January is CHA Month!

Hello Fellow Scrappers!  January is the best time of the year...yes, for the dedicated scrapper it's exciting because of the CHA!!! I love seeing all the sneak peeks and the beautiful creations of the gorgeous products to come. I can hardly wait to see it all in person. Oh yes...for me this is an exciting time of the year! I LOVE IT!

I have two cards I am going to share with you.  This first card took a bit more imagination and time then I thought it would, but I finally came away with a vision of what I wanted to portray. I thought of the roaring 20's when women hats had lots of feathers and this is my paper version of this era.
I created this card in response to the Tuesday Color Challenge on "The Outlawz."  We were challenged to use the colors Tangerine, Lime Sherbert and Black. The colors were easy enough but the twist was to add a feather, thus the fuzzy feather on my card.

I used a digi stamp from Stitchy Bear and added a little bling on the veil and some pearls from Zva around her neck. The floral buds are from Wild Orchid.

I used a Sizzix die to cut out the black flourishes and of course Spellbinder's nestabilities were used for both the oval and the scalloped oval. The patterned paper is from a DCWV paper pack and the cardstock is Bazzil.

I am entering this card in the Tuesday Sketch Challenge on "The Outlawz." I try to participate in the Sketch Challenge on a regular basis because they are such fun to see a sketch and then let your imagination run as far as you want. Forgive the shadow please, but seems that I always have that issue if I am not using direct lighting.

The images and paper are from Websters Pages and the sentiment is from Stampin Up "Pursuit of Happiness" stamp set.
Thanks for stopping by my blog today! I hope you brought in the new year with lots of celebrations and fun and created lots of lasting memories that you can capture on paper.  Now...it's time for me to enter another challenge and to remind you about my January Challenge that is currently open for participants.

Thanks for stopping by Blog.....I think that you are awesome!

Remember to..... find beauty in all things and then....go create it!

Challenge Cards

After recovering from the flu I decided to enter both the Wednesday Sketch Challenge and the Tuesday Color Challenge hosted over on "The Outlawz."

This first card was in response to the Tuesday Color Challenge. In this challenge we had to incorporate three colors in our card and add some beads as the twist. The colors were coral, kraft and white. My card consist of the following:
DP: Bazzil Coral, Kraft and White Vanilla
Beads: Recollection
Image and Sentiment: Stampin Up
Other: Gel Pen, Ribbon, Embossing Powder

The second challenge is the Wednesday Sketch Challenge. As the title states we were required to create a card based on our perspective of a sketch and this is my take on the sketch.
DP: DCWV Paper Stack
Stamp: Rubbernecker Stamps
Beads: Recollection
EF: StampinUp
Spellbinders Scallop Circle and Large Circle Nestability
Inks: Walnut Stain distress ink around the sentiment

Well thats all I have for this post.  Thanks for stopping by and remember to .....

find beauty in all things and then....go create it!

Community Service

Hello Everyone, I hope things are going well for you.  As for me I am slowly returning to my normal happy self. I wanted to share some news about this month's challenge. As you know it was my intent to offer a Grab Bag Giveaway, but due to a very good cause that idea has been transferred to better things. It seems there are a few local senior citizens that are interested in learning how to scrapbook and make a few standard cards and I was asked to be the teacher. Since my favorite groups of people are children and elderly I couldn't say no, and needless to say since I will be providing all the supplies the paper has now become a necessity for this adventure I am planning to embark on.

This should be fun and I am truly excited about it so wish me luck.  Additionally, I hope to get the seniors at my church involved as well and together we can make it a great day.  In the meantime I would like to share a card with you.  This one I call "Playing Hooky."
Card Supplies:
DP: Graphic 45 Le Cirque Collection
Accessories: ornate frame and tag from Tim Holtz Idealogy Collection, Tim Holtz paper tape
Media: Distress Inks and Copic Markers
Image: Prima

That's all I have for today.  Thanks for stopping by and as always.......

Find beauty in all things and then ..... go create it!

Welcome 2012

Yipee I made it to 2012 and believe me when I say "every day above the ground is a blessed day." Well I made it but it was a hard hard road I tell ya. After visiting my grand-kids I returned home to discover that I felt a little achey and unusually tired. I had no doubt that a cold was approaching. I fought with all my might but having COPD, made resistance futile (got that from the Cyborgs), so I reverted to simply treating the symptoms with hopes of recovery.

It has lasted from 30Dec-3Jan, and I'm still struggling with the stuffiness and the coughing but thats okay...my energy has returned and I am back in the KraftLab ready to create (coughing, sniffing, trying to breathe).

Before I continue let me once again congratulate Ellen Kristiansen for winning my December challenge. I finally got her goodies posted and hope she will enjoy her winnings.

January is a celebration month for me, with my birthday (Jan 2nd) and the three holidays that means I can lay around and be lazy, so I thought what better way to celebrate than to share what I have (achoooo, sneezing). 

I will soon be posting a "Paper Stash Giveaway" where I will pick five winners to receive 2-3 paper packs. These paper packs are mostly DCWV paper packs (I think I have them all) that I've either duplicated (due to gifts or forgetfulness) or I no longer have a need for and they have been stored on a shelf waiting to be used. A few of the packs are new and the others were gently used, missing only 4 - 6 sheets.  By the way they are mostly 12x12, but a few are 6x6 and photo size paper packs.  I will explain more in a later post (sure hope this theraflu is worth all the hype).

Tonight I would like to share a card with you guys that I think turned out pretty good. It was a bit time consuming especially with me needing to rest every 30 minutes.  Thanks to Tammy Louise for being my inspiration with this card. So here you go.

Recipe:
Image: Vintage Clock Digi Stamp
DP: Bo Bunny Timepiece Collection
Florals: Wild Orchid
Prima pearls
Tim Holtz tags
Inks: Vintage Photo, Walnut Stain, Worn Lipstick
I also added the clock hands (Tim Holtz) and the corner pieces. Printed the beginning of the sentiment on my computer.
Continued the inside using paper from the same Bo Bunny collection pack. The chain and monogram are from Tim Holtz idealogy assortment. Not shown is the sentiment I added after I took the picture. I finally decided to use a quote from Waldo Emerson about time.
Well that's all for now.  Hope you enjoyed and thanks for stopping by.  In closing my post I always want to remind everyone to ......

"find beauty in all things and then go and create it"

By the way since you're here, please take time to leave a comment.  It does a grandma's heart good to know that she might have shared a smile with someone.

Double-Dutch Fold Card

by Patty Bombyk
Create a unique card fold with a few score lines.

Supplies

  • One 4 3/16" x 9" piece of cardstock for card base
  • One 2" x 8 1/2" piece of cardstock for dutch fold bottom
  • One 4" x 3 1/4" piece of cardstock or patterned paper for your layer
  • Scoring Tool
  • Adhesive
  • One large image or die cut of choice
  • Stamps of choice

Step-by-Step

  1. Step 1

    Score the 4 3/16" x 9" piece of cardstock at 5 1/2. Set aside.
  2. Step 2

    Score the 2" x 8 1/2" piece of cardstock at 2 1/8" and at 6 3/8", like a gate fold card.
  3. Step 3

    Fold the outer panels of your 2" x 8 1/2" piece of cardstock in and decorate as desired. Adhere the center panel at the bottom of the back of the 4 3/16" x 9" piece of cardstock piece.
  4. At this point it should have double folds along the left and right side and at the top.
  5. Step 4

    The bottom of the top fold should line up with the double doors at approximately 3 1/2" from the top.
  6. Step 5

    Decorate the card as desired.

For those of you that are more visual below is a video of how to make this card.


Double Embossing Technique

Double Embossed Enamel (Cindy Elam)

Supplies Needed:
1. White Cardstock
2. Big Shot
3. Two Embossing Folders
4. Embossing Buddy
5. Embossing Ink
6. Heat Tool
7. Clear Embossing Powder


Step-By-Step Instructions


Step 1: Using your focal (simple detail) folder tap the embossing ink all over the side of the folder with the recessed image, inking it thoroughly. (don't press to hard to avoid getting ink in the recessed areas.


Step 2: Rub embossing buddy over your white cardstock and carefully place into the embossing folder with the "buddied" side facing the inked inside of the folder.  Run it through the Big Shot (or other machine)


Step 3: Cover inked embossed cardstock with embossing powder.  Tap off excess powder. (use a tiny brush for removing powder from unwanted areas)


Step 4: Heat your cardstock with the heat tool until the embossing powder turns shiny.  Allow the embossing to cool.

Step 5: Run the cardstock back through the Big Shot using your background embossing folder.  You now have a double embossed image.


 All that is left is for you to mat your double-embossed image and create your card!

For visual learners I have included a youtube video showing this technique.  Thanks Cindy and SplitCoastStampers.


January 2014 Challenge

The clock has run down and we have entered a New Year, which can only mean that it is time for a brand new challenge at Mema's Crafts.

For this challenge we have decided to play BINGO! That's right all you do is select your bingo row and create your project ( it can be a card, box, layout, ATC, door hanger or anything you want).  Here's your bingo card.


With the new year comes a few new and wonderful sponsors.  Please stop and help me welcome "Frantic Stamper", a new sponsor of Mema's Crafts.
My name is Fran and I am the owner of Frantic Stamper.   We are a full service paper-crafting online store specializing in just about anything you want!  We are located in beautiful Southern Oregon, but we ship all over the US and all over the world.  Our newest obsession is designing our own line of cutting dies which can be seen here: http://www.franticstamper.com/Frantic-Stamper-Precision-Dies-_c_4569.html (be sure to click on each category to see the dozens and dozens of dies we now have!!

The winner will be awarded 5 dies from our line of Frantic Stamper Precision dies.


And of course we'd like to welcome back our friends at Kenny K who will sponsoring this month as well.  One winner will receive 5 Digi images of their choice from an array of choices.

You must check them out...some are sassy and others are retro, but there is one for every occasion.  Remember to enter early for a chance at both prizes.

Remember to read the rules for entering our challenges.  If you do not have a blog remember you can send your creation to Mema and she will enter it for you.  Winners will be selected on the 15th and the 30th of the month and posted the next day so be sure and check back.

Now to get you started my girls and I have created a few projects using Kenny K digi stamps and then a few cards using stamps and precision dies by Frantic Stamper.


Ari
(created this cute tag card)
(Digi Stamp (KennyK), Bloom, Trinket)


Joyce
(my enchanted paper creations)
wallet-style mini photo album
Used Dies, Brads, Digi Stamp (KennyK) and Distressing
Mini partially open

Gabbi
Decided on a Gift Bag
Tim Holtz Tag Die, Black Soot Distress Ink and Buttons
Lesia
(Mema's Crafts)
Used Digi stamp (KennyK), Marianne die, Zva pearls

Lesia
Rubber Stamp (Frantic Stamper), dies (Frantic Stamper), 
distressing, blooms and brads

Gabbi


Rubber stamp (Frantic Stamper), heat embossing, dies, pearls

Ari
Dies (Frantic Stamper Precision Dies), Blooms, embossing, ribbon
Joyce

Frantic Stamper Precision Die Border Punch
Now it is your turn to share with us.  Can't wait to see what you create!
Related Posts Plugin for WordPress, Blogger...