Double-Pocket Card (Inside Pockets)


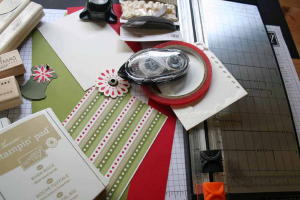
First, gather your supplies ... You will need:
· Two stamped images (I have used Willow with Coffee to Go )
· Sentiment (I used General Sayings , Season's Greetings - frame )
· Two 12 x 12 sheets of card stock
· One sheet of coordinating cardstock for matting
· Patterned paper for your cover and card folder
· Ribbon
· Extra tack adhesive tape
· Scoring tool
*****************************************************************

  
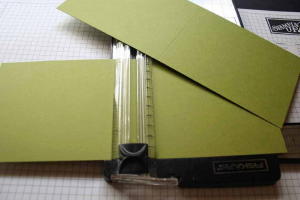
Taking your first piece of 12 x 12 cardstock, score it in half at 6 inches


Turn this card stock 90 degrees and score it at 6.5 inches


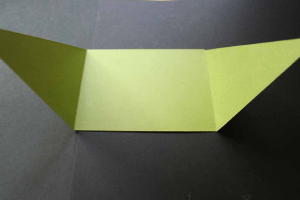
Your cardstock sheet will look like this:


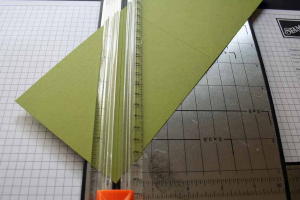
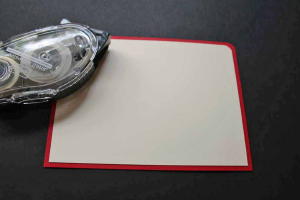
Fold the cardstock in half score at the 6 inch, and place this in your paper trimmer, and cut diagonally from the intersection back to score the corner edge of the cardstock of the shorter 1 5 / inch 2 section


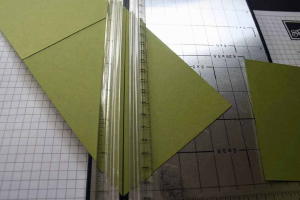
When opened out, your cardstock should look like this with the two sections at the top rectangle measuring 6 x 6.5 inches and two triangle pieces at the bottom measuring 6 x 5 .5 inches
 

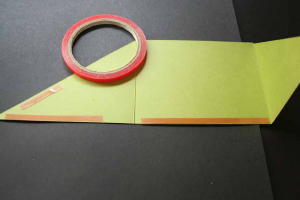
Apply some extra tack adhesive tape to the sides of the triangle ends


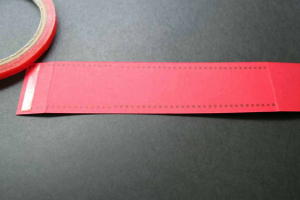
Magical Cut two tags from your coordinating cardstock and trim one of those tags about half way along. Then attach this tag to the edge of your right side rectangle section half way along the edge. I trim the edge so that it does not interfere with the card when it is inserted later on.


And then remove the tape backing from the adhesive tape and stick the triangle sections to the rectangle sections lining up your edges carefully 


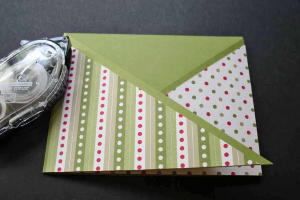
Decorate the inside of your folder keeping in mind that you do not want it to be too bulky as you need to be able to insert your card and gift and close the folder


Then create a folder for your topper and decorate it making sure to attach your other Magical days to the side of the topper exactly in line with the tag below 


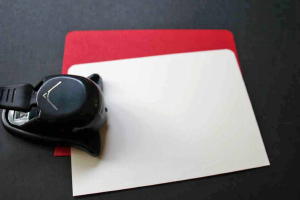
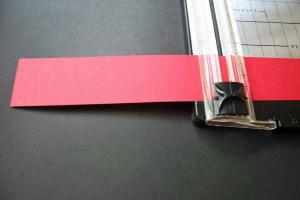
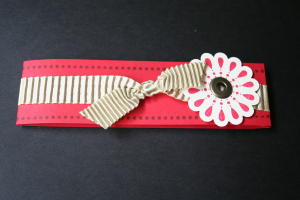
From you second sheet of card stock, cut it at 5 1 / 2 inches and score at 6 inches so you have a card measuring 5 1 / 2 x 6 inches that will fit neatly inside your folder. Decorate this card to match your folder cover, but again Ensuring that you do not have extra bulky embellishments that will hinder the folder closing neatly.


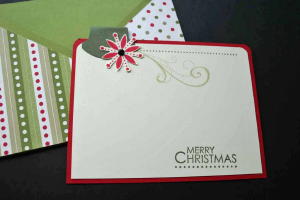
Stamp your "Seasons Greetings" frame onto white cardstock, add your sentiment than from your 'Sayings General "set and line up your guide to clear and mark the small dots, align the die and cut out your sentiment.

  
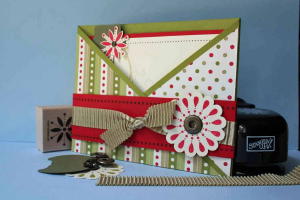
And here is the finished card and folder and the inside of the folder with some yummy goodies caffeine.


These folders so make cute covers for sending out to stash your crafty friends! I hope you find this tutorial useful and have a wonderful weekend!


Christmas Break

Yahoooooo! It is Christmas break and for the next two weeks I will be able to craft all day long...at least from the time I get up to the time I go to bed, if I go to bed at all.  I have been looking forward to this day and it has finally arrived.  Well, I won't get to spend the entire time alone with my paper (yes I have a weird relationship with my paper) because I do have little ones that expect their mema to spend time with them. So I am packed and my days are planned and I will be traveling this weekend so before I leave I thought I would enter another sketch challenge just in case I don't get an opportunity to enter one for a while.

So here is a card I created for "The Outlawz" Wednesday Sketch Challenge.
The Recipe for this card is as follows:
Paper:  Authentique Nest Comfort and Familiar Collection
Flowers: Coffee Brown Curly Wild Roses from Wild Orchid and Prima
Recollection Pearl Studs
Image:  Magnolia Kitchen Tilda
Media:  Copic Markers

Well until next time stay safe and create.  Thank you for stopping by.

Color Me Chocolate Winner

Hello Everyone
This year has had its' ups and downs, but through it all I have been blessed over and over again.  I find that life in general can be very interesting and if you take time to just sit still and listen to it, you would be amazed at all the things you can hear.  This year I decided to de-clutter my craft room and when I started there were things hidden in some really odd places.  I mean how many "Croc-o-diles" does one person need? And I wonder if unopened ink dries up?

I have paper packs I forgot I had or paper packs with only one or two sheets missing. I hate to throw these things away, but I really don't need them so I'm wondering what you guys would think about a chance to win them and all you have to do is sign up......

Leave a comment and let me know what you think. I have duplicate stamps, DCWV Paper Paks to give away, Flowers (not sure of the brand), a ton of stickers, a couple of cricut cartridges, and a few other items that I need to sort through and make sure they are in like-new condition.  Does anyone need letter packs?

If you think a "Grab Bag" blog would be cool leave a comment and let me know and if there is enough of interest then I will post the items and open Mr Linky for sign-up. No real rules...be a follower, leave a comment and add your name.  With enough of participants we have enough items to award at least 5 individuals a grab bag.

Well before I forget that there is business I need to attend to let me say that I was really excited with my previous challenge because the participation almost hit the goal of 10 but unfortunately the "Color Me Chocolate Challenge" closed with only 9 of the 10 desired participants. 

All of the entries were gorgeous and I personally want to say "thank you for taking time to participate in this challenge.  I appreciate the effort you put forth to participate and wish I could award all of you, but unfortunately I can't...and, since we did not reach our goal my team decided that a fair decision would be to allow the random generator to select the challenge prize winner.   

So without further ado allow me to congratulate...and announce that the challenge winner is.........................

#1 - Ellen

Ellen, please contact me with your postal address so I can sort out your winnings.  Feel free to take my badge for your site.

Again congratulations!

*************************************************************************
There is a challenge every month so be sure and stop by often.  Next month (January) we might offer a giveaway instead of a challenge.  Remember to let me know if you're interested in a "Grab Bag" Giveaway.

Wishing All My Crafting Friends
A Very Merry Christmas
With Family and Friends

Remember to "Find beauty in all things and then......go create it"

Triangle Tri-Fold Card

Dawn Olchefske, Stampin' Up! Independent Demonstrator

dostamping@yahoo.com, 612-269-5540

http://dostamping.typepad.com
Supplies:

 4" x 12" piece of Rich Razzleberry Cardstcok

 3-3/4" x 3-3/4" piece of Cottage Wall Designer Series Paper (cut in half diagonally)

 3-3/4" x 3-3/4" piece of Pale Plum Cardstock (for inside panel)

 2-7/8" x 2-7/8" piece of Old Olive (for punched front panel)

 2-3/16" x 2-3/16" piece of Rich Razzleberry (to layer on Old Olive punched panel)

 Scrap of Rich Razzleberry (for cutting butterflies)

 22" Old Olive Satin Ribbon

 Vintage Labels stamp set (FREE with $50 order)

 Scallop Border Trim Punch (FREE with $50 order)

 Scallop Corner Punch

 Scallop Circle Punch

 Paper Trimmer w/Scoring Blade

 Beautiful Wings Embosslit

 Big Shot Die Cut Machine

 Stampin' Sponge

 Stampin' Dimensionals

Instructions:


4" x 12" piece of Rich Razzleberry Cardstock
1. Score 4" x 12" piece of cardstock at 4" x 8"

2. Fold each side into the center

3. Score each side on the diagonal (both in the same direction)

4. Fold each diagonal away from you.

5. Decorate the triangles indicated with an arrow with half of the 3-3/4" x 3-3/4" (which was cut in have on the diagonal)

6. Tie off with ribbon and pull all the way to the right.

7. When adding the decorative panel to the front, only adhere it to one of the "triangles" (so your card will be able to open).

Gift Card Holders (Wallets and Purses)

These videos will give you step-by-step instructions on how to make the wallets and little purses I posted on my blog.


The first video is how to create the "Faux Leather Wallet".  If you want the written instructions the video will tell you the website at the very end.


Video 2:  This is how to make a cute little purse using the top note Sizzix die.  It is to adorable and after you make one then you can make adjustments for yourself and then you will be able to make several in just a few hours.


Basic Grey Challenge Anything Goes

Hello my friends, I hope you are keeping warm where ever you are. Today started out in a bad way for me..my head ached and my tummy would not cooperate with me so needless to say I stay hugged to my bed for the better part of the day.  I tell you I was not a happy person, but here it is 7:30 pm and I'm just now feeling more like myself.  My four-legged friend "Gizzi" must have known I didn't feel well because she was so well behaved and just laid at the foot of the bed moving only when I jumped up to go and converse with the bathroom...horrible conversation.

Anyway my newest card is for Basic Grey's Challenge "Anything Goes" and I plan to enter this card tonight if I don't fall asleep before I get it posted.
The patterned paper is all Basic Grey Marjolaine 6x6 paper pad. I used Tim Holtz's distress inks to distress all the edges, stitched around the edges and added a few pearls to finish my card. My image was colored with copics and I added sparkle to the wings with atyouSpica pens. Below is a closeup but I don't think the sparkle shows.

I'm entering this card in the Basic Grey Challenge and any other challenge I can find.

Card Recipe:
Cardstock: Basic Grey Marjolaine 6x6 paper pad
Ribbon: Offray Microcheck Brown 5/8 inch
Sentiment: Paper Studio Clear Stamp Pack
Image: Digital Stamp Kenny K
Stamp: French Writing Inkadinkado
Glitter: Silver atyouSpica pen
Copics Used: Y23, YR23, E35, E11, E00, E000, G20, G22, G24, B17, B19, C1, C3

As always "Find beauty in all things and then....go and create!


Criss-Cross Card

This tutorial was created by Beate JohnsSupplies

  • Two 4 1/4" x 11" pieces of cardstock for your card base
  • One 4" x 5" piece of patterned paper
  • One 3 3/4" x 5 1/4" piece of cardstock for insert
  • One 3 1/2" x 4 3/4" piece of neutral cardstock for insert
  • One 1 1/2" x 12" piece of colored cardstock for card band
  • Ink
  • Stamps
  • Adhesive
  • More paper for accents
  • Corner rounder
  • Embellishments

Step-by-Step

  1. Step 1

    Score both 4 1/4" x 11" pieces of cardstock at 5 1/2".
  2. Step 2

    Take one scored piece and cut it diagonally from center top to the bottom left.
  3. Step 3

    Take the other piece of scored cardstock and cut it diagonally from the center top to the bottom right.
  4. Step 4

    Add adhesive to the rectangle back of one of the cardstock pieces.
  5. Step 5

    Tape both pieces together. Make sure both long edges of the diagonal sections are on the bottom.
  6. Step 6

    Cut the patterned paper in half diagonally.
  7. Step 7

    Adhere it to your card front. I used double sided patterned paper (Dashing, from Stampin' Up!). The dotted paper is on the back of the striped design.
  8. Step 8

    Add Sticky Strip™on the bottom of the middle panel, as well as on the bottom of the triangle flap that will be on top of the card.

    Tape the card base together and set aside.
  9. Step 9

    Take both pieces of cardstock for the insert and use the corner rounder on the top corners.
  10. Step 10

    Tape together.
  11. Step 11

    Stamp and add tab and other embellishments as needed.
  12. Step 12

    Take the 1 1/2" x 12" piece of colored cardstock and score at 5 5/8" and 11 1/4".
  13. Step 13

    Add Sticky Strip™ to the end of the strip with the small 3/4" scored section. Tape band together.
  14. Step 14

    Decorate the card band.
  15. Step 15

    Slide your band over your card.
    Your card is finished!

Happy Birthday

These cards I sharing are a couple of birthday cards for you to ponder. One is for a teacher and the other is for a male that likes Ford Mustangs but since I couldn't find a stamp of a mustang (other than the horse) I figured Tim Holtz's Jalopy would do once UTEE was applied and for the teacher I thought the inchworm reading was appropriate.


Happy Birthday Teacher


Happy Birthday Mustang Enthusiast

Thank you for stopping by and please come back often.  Before you leave please become a follower of my blog and leave a comment about what you see (bad or good) your comments are welcomed and appreciated.

Note:  The Color Me Chocolate Challenge now has 5 participants and 10 is needed for release of the full prize.  Someone will win something (consolation prize) if we don't get the required 10.

As always "Find beauty in all things and then....go and create!

Gift Card Stampede

Can I just say that I have been a busy beaver with gift card holders. I think I have watched every video at "YouTube University" and have tried my hand at several different kinds of gift card holders.  From bonnets, and shoes on to ornaments and cards with pockets.  Then I found the cutest little purses and I was stuck on them...and how fair would it be to have a purse for a gift card without a wallet as well.  So the search was on until I found the perfect wallet. I also learned a new technique called "faux leather" while I was conducting my research.  Check my tutorial section for instructions on how to make both the top-note purse and the faux leather wallet. If you haven't read the post by Scrapbook Stampinista then you should..that lady will have you cracking up.

These little purses are just adorable and the wallets turned out better than I expected, so let me move along and share with you.
I so enjoyed making these little darlins, but a note of caution when using linen paper. I discovered that not all adhesive is created equal. Finding an adhesive that would hold the linen paper was very difficult, so I would recommend liquid fabric glue or just stitch your pieces together. The little orange one I missed the measurements so I had to improvise to keep what I had (not wasteful) and I think it turned out kinda cute.

This little set made such a cute pair and this little purse was a different spin on the use of the top-note die by Sizzix or the one from SU.  Actually, I think the one from SU is a Sizzix die.
These aren't all the wallets I made...I think I made a total of 10 since they were just that easy.  The inside is what makes the wallet unique and the fact that the paper has the feel and look of leather. The very top wallet was designed with an embossing folder, and then embossed with clear powder twice and it really looks (worn and cracked) and feels like leather.  The gold one is actually intended to be a clutch but I hadn't added the chain when I took this picture.

At least I don't have to worry about envelopes. No sirreeee! You can purchase these hard to find envelopes over at Craftezee, so check her out if you're in need of envelopes or you are tired of making your own.

Well now you know how I've been spending my time...creating gift card holders. Hope you enjoyed your visit and will come back. Don't forget that your comments are always welcomed and appreciated.

So until next time...."find beauty in all things and then...go and create"

Colored Pencil Tutorial

The tutorial below was not created by me.  I found it quite by accident and after following it, thought it was worth sharing with everyone.  If you prefer not to use Copics or ProMarkers but want the same effect then try this technique with plain old colored pencils.  The results will amaze you.  If you like this tutorial please visit Dorcas Designs and tell her thanks.

Colored Pencil Tutorial

Hi guys! This is a tutorial I made for my good friend, Annemaritta who is just learning the wonders of coloring. She has asked for some tips and I'm going to do my best to give her a few. :-)
If this tutorial helps anyone else I am very happy for it.
Above you see the supplies.
I use Prismacolor pencils most of the time. The fact is,I've tried several brands of colored pencils and Prismacolors have the softest ,creamiest lead. So if you can find them I would suggest you invest in them.


As you can see, I'm not using many colors here. And my pencils are not the sharpest.
I don't mean them to be.

Start off with very gentle, soft, circular strokes.
Find where your shadows would be (in this case I decided that the sun is coming from the right side, leaving the left of the bunny in shadows.This is where I am going to put down color.

See? You don't see any line marks because we went in light  circular  motions.
Now we'll continue with the rest of the body.

Pretty easy so far, right?
Now lets get out the goo gone or baby oil. I have put some sqares of felt in a container and poured a bit of goo gone on top to wet the squares. I am not going to saturate my blending stump. I am only going to dab my stump on the felt to moisten my stump.


Lets start with the ear.
From the outside in, work in circular motions to blend your pencil.


Looking nice. Now we'll continue with the rest of the body.
Now, it's looking pretty good but to make it pop we need to darken the shadows a little bit.
Use the same pencil.

Now blend again.

We're not done yet.
 We haven't even touched another pencil yet! Lets get out the sepia pencil.


We want to darken the deepest shadows with the sepia pencil.
And you've got it. Blend. :-)

OKay, lets grab one more pencil. A pink pencil for the feetsies.Just do the same as you've been doing.


Blend.

And the finished wittle bunny wabbit.

I hope you had fun :-)

Related Posts Plugin for WordPress, Blogger...